Create a new article
To start using the tool, you have to create a new article. 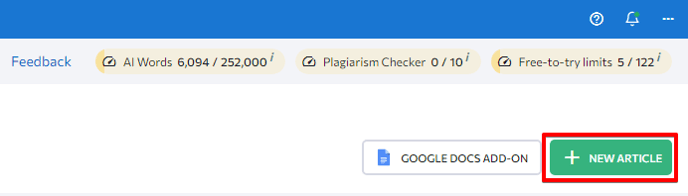
To do this, click on the corresponding button as shown in the screenshot and fill in the fields in the new window:
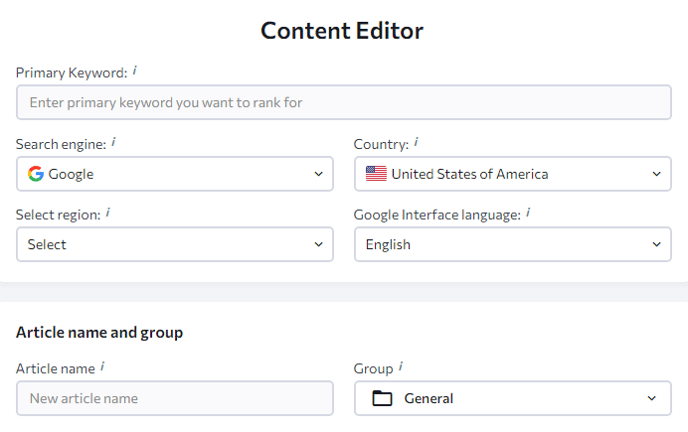
- Add the primary keyword you want to rank for.
- Select a search engine, country, region, and language.
- Create the name of the article.
- Select a group from the list or create a new one.
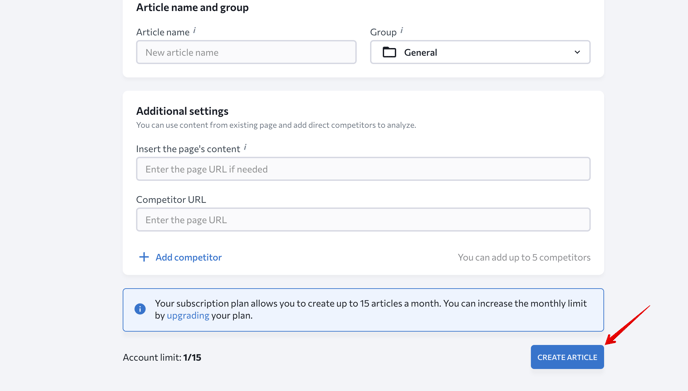
5. You can specify a link to the page from which you want to import text content into the platform.
6. Add up to five direct competitors to analyze if needed.
7. Click on the Create article button to start collecting data.
Once the process has been completed, the tool will transfer you to the brief settings of your future article. For more information on how to set up briefs, see our related article here.
From the brief settings section, you can go either to the visual editor (by clicking the “Go to Content Editor” button) or to the main menu of the tool (by clicking on the “Content Editor” located within the breadcrumbs in the top left corner).
Choosing the latter will take you to the main tool’s section, where you can view all your articles, as well as details about them like their region, keywords, content score, brief progress, and update date.
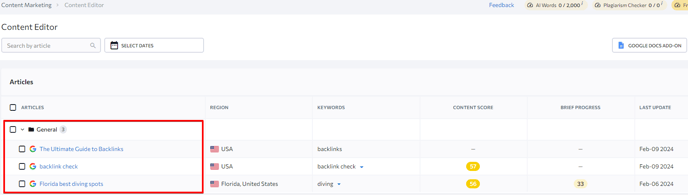
You can also initiate a manual article reanalysis here by clicking the “Recheck” button (available only to article authors and admins). Keep in mind that competitors, terms to use, links, and questions will be updated after the recheck. Manually added terms, links, questions, and notes will remain unchanged. One limit will be deducted to conduct the analysis.
If you want to delete an article from Content Editor, click the three-dot button and then select “Delete.” To delete several articles at once, tick the checkbox next to the articles you want to delete and click on the “delete” icon.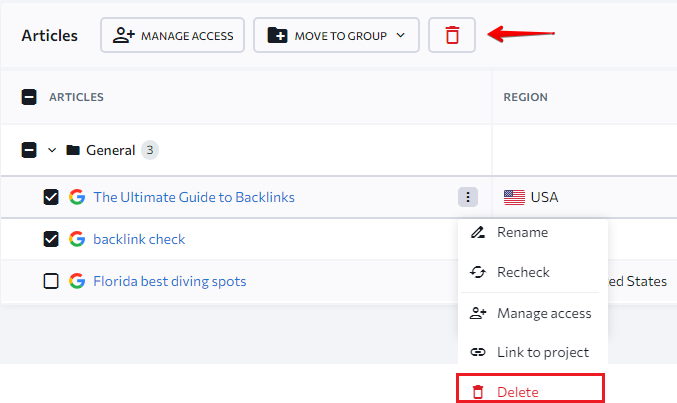
To change the article's name, manage user access to it, or link/unlink one or more articles to a project, select the corresponding options from the three-dot button menu that appears next to the article’s name in the table upon mouse hover. Note that the project linking feature is only available to article authors and administrators.
Article analytics
We gather analytics for any published articles that are linked to projects and have their URLs specified. This data will be available in the main table of the Content Editor. It will appear in the form of the following additional columns: analytics, impressions, clicks, avg. CTR, and avg. position over the last 30 days. If you have added the page’s URL, it will also be shown here. 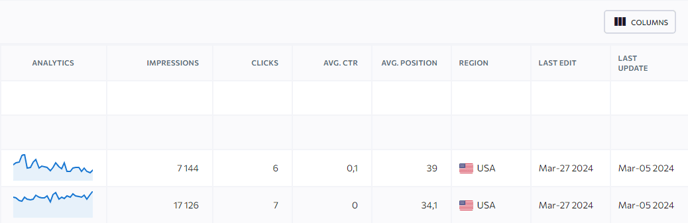
The stats are updated once a day based on Google Search Console data. Please ensure that the project your article is linked to is connected to the Console to gather analytics. You can manage this table’s contents by selecting the columns to display.
Detailed article analytics
For more details about your article’s performance, click on either the graph or the numbers in the columns that display impressions, clicks, avg. CTR, and avg. position. Only the author of the article and sub-accounts with access can view these analytics. 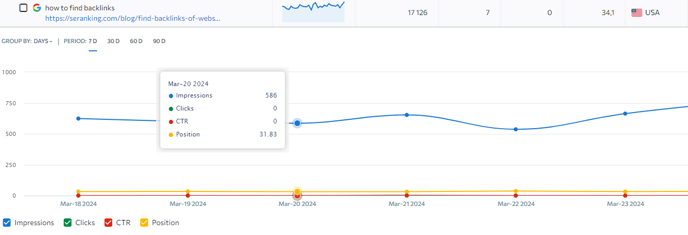
By default, all of the article’s impressions, clicks, CTR, and position changes are displayed as line graphs here. Each stat can be deactivated by clicking on the stat’s name. You can also select a period from which to display data: 7, 30, 60, or 90 days. This period can be grouped by days, weeks, or months.
Article authors and sub-accounts with access to corresponding articles can also add personal notes to this graph. Just click the “Add note” button above the graph on the right. You can specify the details of the note in the menu that appears, such as date, title, and description.
You can use this feature to mark the day your article was published or updated to monitor how their metrics change over time. This way, you may better understand which changes have the most effect.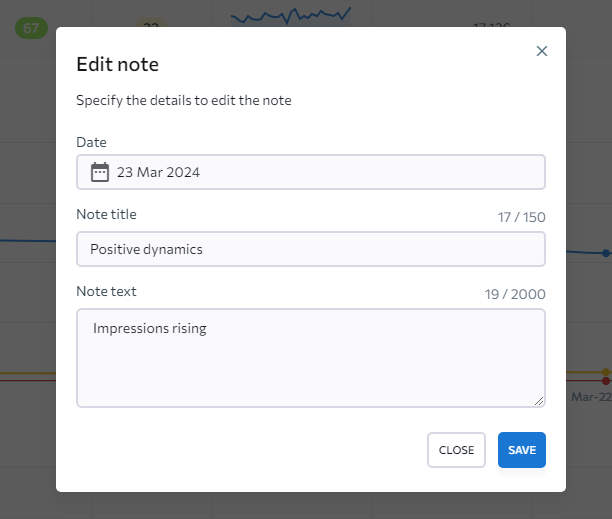
Added notes will appear on the graph alongside their corresponding dates. Each note will feature an icon resembling a sheet of paper and a vertical line with the note’s name on it. Note that any notes created for future dates won’t be displayed on the graph. Clicking on the icon will enable you to edit or delete that particular note and view all your notes. 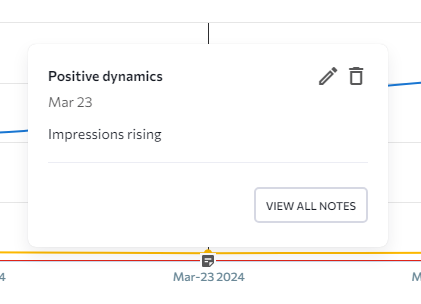
One-click article generation
To quicken the article creation process, you can always generate an entire article in one click. For this feature, you will be using our default settings, which allow you to skip the step-by-step generation. At the time of the release, it will only be available for English texts.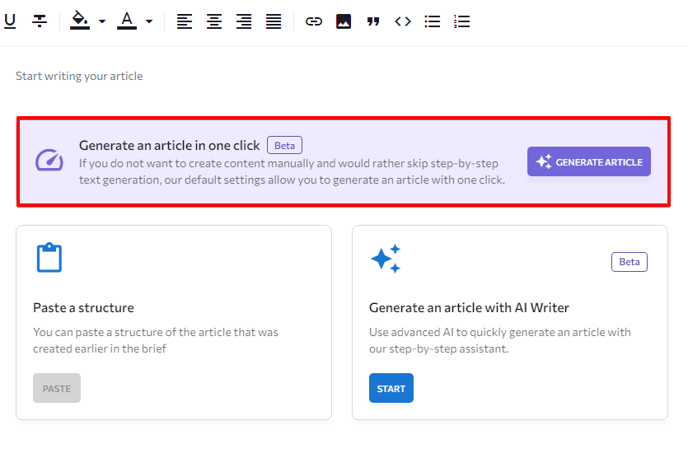 The marked section from the image above is displayed whenever you are viewing an empty article. After clicking the “Generate article” button, the tool will instantly start the generation process.
Choosing the one-click article generation option will deplete your article limit and available AI words. Before generating an article, we recommend ensuring that you have enough words to create a complete article.
Step-by-step article generation
If you want more control over article generation, you can do so with our AI Writer Wizard. The process guides you step by step and has five stages.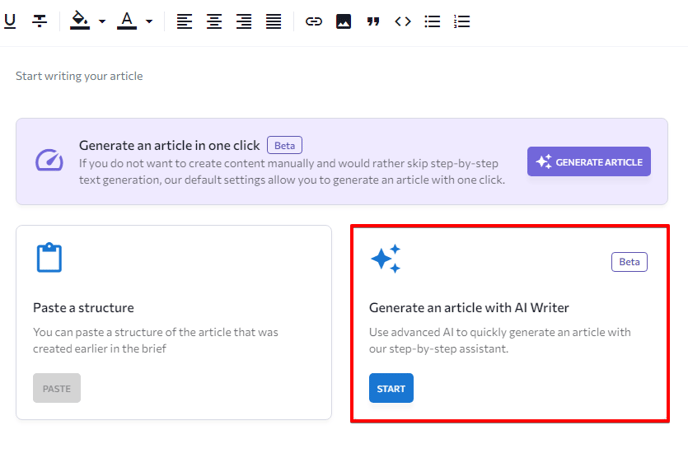
Step 1: Specify general settings (keywords, tone of voice, etc.).
Step 2: Outline settings (topic, structure details, places for images and alts, etc.).
Step 3: Build an outline (add the generated content to the article, edit it, or generate more).
Step 4: Build talking points (specify talking points and terms for each heading).
Step 5: Wait for the tool to generate your article.
The tool will inform you before proceeding to the next step if you run out of text generation limits.
Edit an article
To open the editor, click on the article name.
On the left side of the window, you can create, upload, and edit your article. Changing the content elements—adding or deleting headers, paragraphs, or images — will affect the scores displayed next to the editor.
You can also use the AI Rewriter to rephrase the text. Just copy and paste a piece of your competitor's content into the tool and push the Rewrite button. The tool rewrites no more than 600 characters at a time.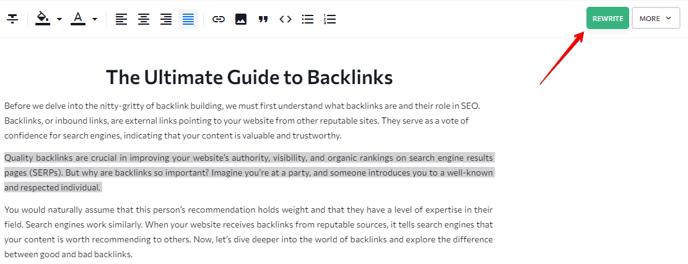
To display the content structure and see how the HTML elements are arranged in your article, hover over the icon as shown in the screenshot and switch to the appropriate mode. Plus, you can underline the terms used in your article. 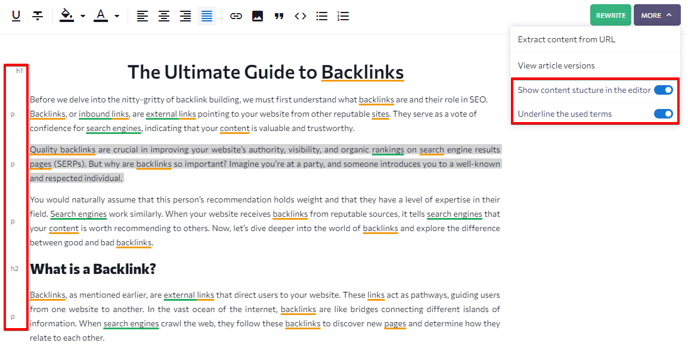
The Content Editor also allows you to view previous versions of your article and restore the selected version (if you are the author of the document). The system stores up to 10 versions of your text. To check your article versions, go to More > View article versions.
You can also extract content from any URL at any time when creating your article. Go to More > Extract content from URL, then enter the URL to automatically extract content from it. 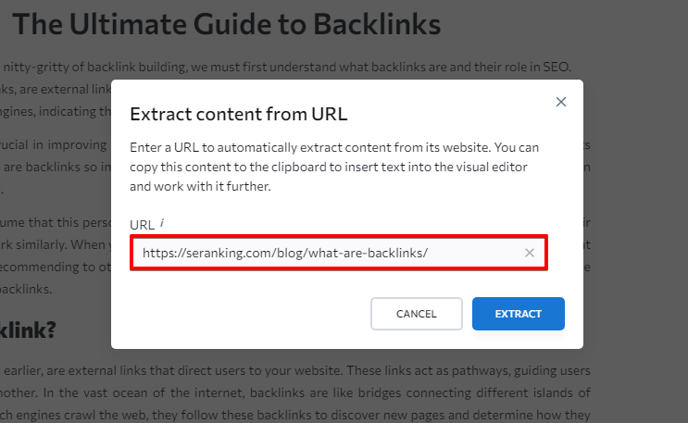
You can copy text to the clipboard and insert it into the visual editor to work with it further.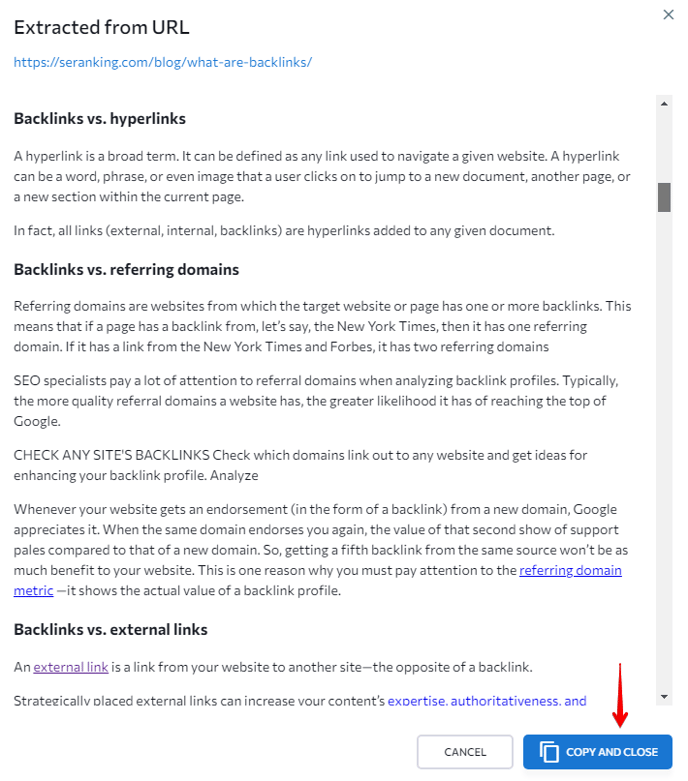
Share your article with colleagues
You can invite anyone to work with you on your article. To give others access to your article, click on the “Share” button next to the blue Brief button. After enabling shared access, copy the link appearing on the pop-up window and send it to your colleagues.
Note that after switching off “share” mode, the old link will stop working. A new link will be created after the shared access is re-enabled.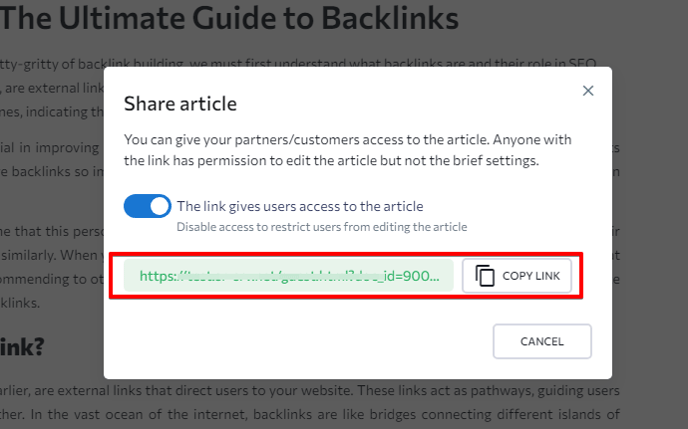
Export brief and article
To export a brief or an article, click on the “Export” button, choose the preferred format, and submit your action. The article can be exported in .docx or .HTML formats or to Google Docs/Google Docs Add-on.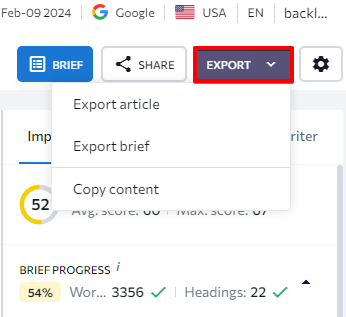
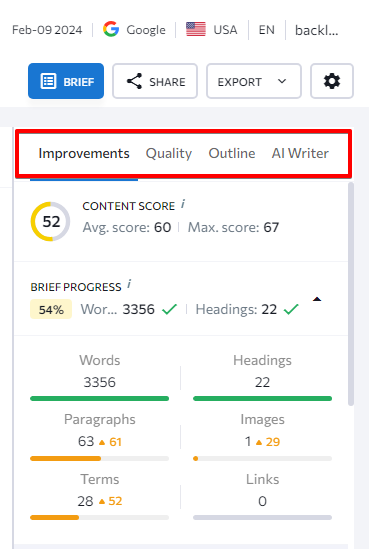
Improvements, Quality, Outline, and AI Writer tabs
On the right side of the window, you will find the Improvements, Quality, Outline, and AI Writer tabs.
Improvements
This tab serves two main purposes. First, it evaluates the Content Score of your article and displays your Brief Progress. Second, it provides various actionable suggestions that will help you improve your Content Score and finish your Brief Progress. You can expand the Brief Progress to see a quick summary of your brief and get an idea of which parameters you still need to work on.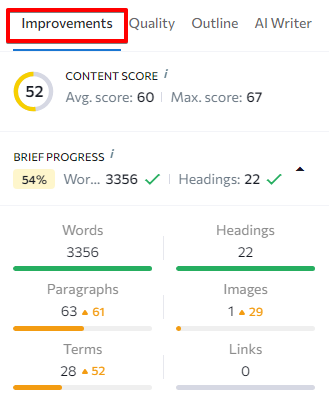
Content Score is a measure of content quality and relevance, both of which affect rankings in organic search results. This metric considers the following factors: character count, headings, paragraphs, images, and the use of keywords throughout the article, as well as in the headings specifically, among other criteria. You can view your content score alongside the maximum and average content scores among competitors.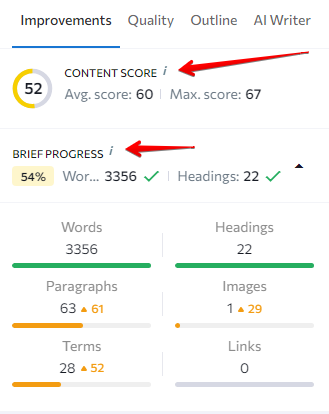
Brief Progress, on the other hand, indicates how well your content meets the requirements of the brief. To calculate this score, we evaluate term usage as well as word count, headings, paragraphs, terms, external and internal links, and images specified in the brief.
The second section of the Improvements tab contains practical suggestions for improving your text. Accepting them will improve your Content Score or Brief Progress (depending on which sub-section you are in).
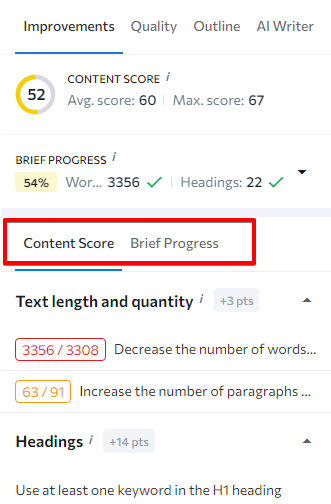
Content Score improvements
For the Content Score, you will get recommendations on:
- Text length and quantity (increase or decrease the number of words/paragraphs in the article)
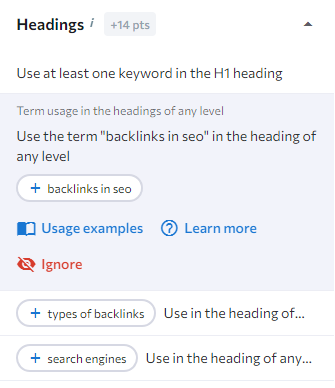
- Headings (add recommended terms to your headings)
- Terms to use (add recommended terms to your text)
- Images (increase or decrease the article’s image count)
- Readability (shows recommended readability level and sentences to rewrite)
Each given recommendation is clickable and can be expanded for additional information. You can discover why it is important by clicking “Learn more.” If you don’t need particular advice, you can hide it by clicking the “Ignore” button (this action can be undone).
All recommendations that involve using specific terms within the text come with an option to add them to the text with a single click. Terms that have already been added may come with a suggestion to increase the number of mentions in the text. Ignoring or accepting a suggestion earns you points that count towards the improvement of your Content Score. The total number of points awarded for each category is shown next to its name. When all recommended actions in the category are completed, it becomes greyed out.
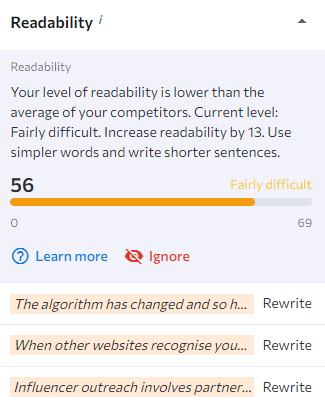
If you scroll down to the bottom of the Improvements tab, you will find your current Readability score along with suggestions on how to boost it. We use the Flesch Reading Ease test to calculate the readability score. It uses a scale of 0-100 to indicate how easy is it to read:
- 90 – 100 Very easy to read
- 80 – 90 Easy to read
- 70 – 80 Fairly easy to read
- 60 – 70 Plain language
- 50 – 60 Fairly difficult to read
- 30 – 50 Difficult to read
- 0 – 30 Very difficult to read
Under the Readability category, you will find all your ignored recommendations from all other sections. You can remove them from this list at any time by clicking the green button.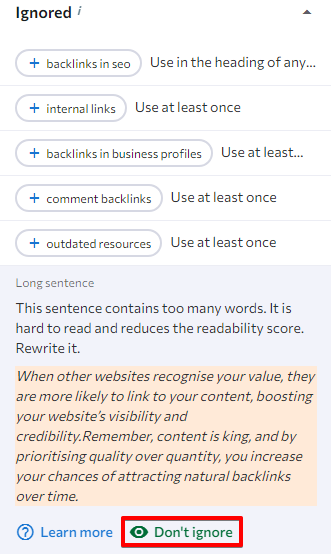
Brief Progress improvements
To complete your Brief, you’ll need to perform various recommended actions, similar to how you address Content Score improvements. The tab contains the same categories as well as an additional one called “Questions.” 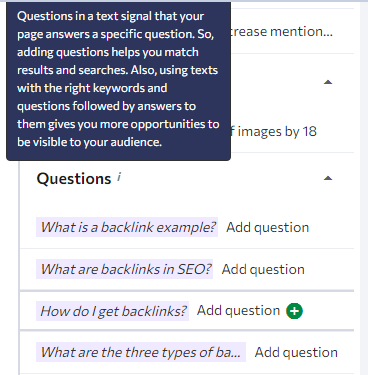
You can easily add suggested questions to your brief by clicking the green ‘plus’ button next to them.
Quality
Under the Quality tab, you will find the score that represents the quality of the content. This score is determined by factors such as the amount of grammatical and punctuation errors in your content, as well as the amount of stop words that add little information (e.g., the, but, somewhat). Our tool considers the country of search to provide the most accurate and relevant suggestions for correcting errors. For example, we divide English into British and American to ensure our tips are tailored to your specific language variant.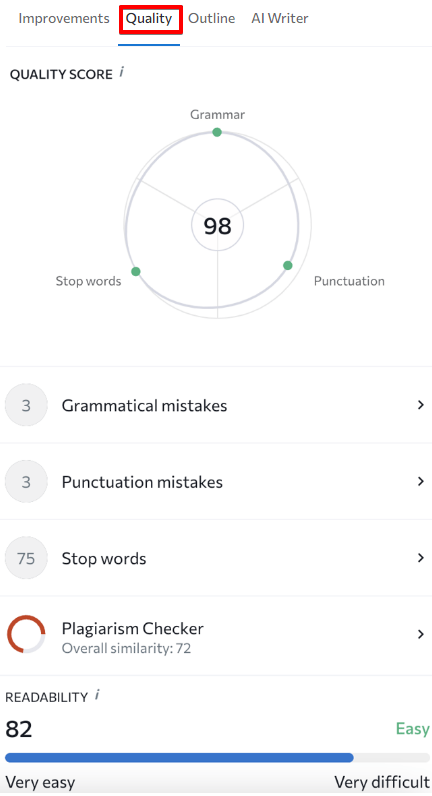
Expand each tab to find out where even the smallest of mistakes are hiding, then click on the correct option and fix it in the text.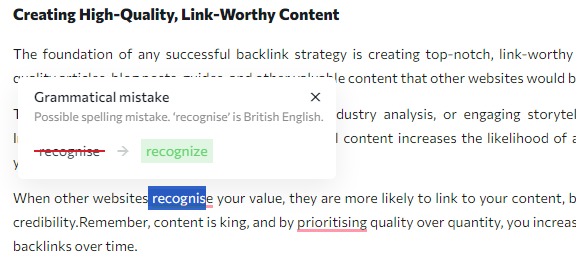
You can also check your content for plagiarism here. The tool will calculate the percentage of words matched, the uniqueness of the text, the number of pages where the match is found, and the number of unique matching phrases from all competitors. You can exclude a domain when checking content. It provides more control over plagiarism checks and more precise results because you can ignore pages with similar content.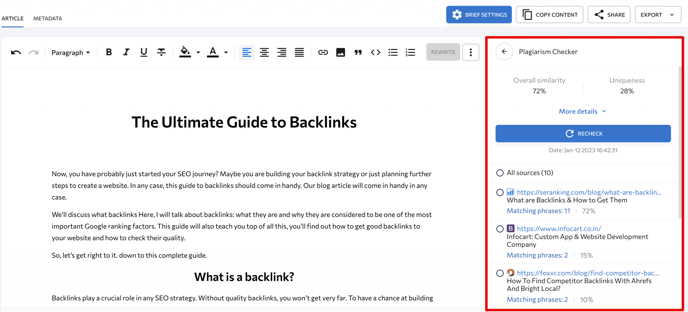
Select any source from the list to see how many matching phrases you and your competitor(s) have.
Outline
Under the Outline tab you will find: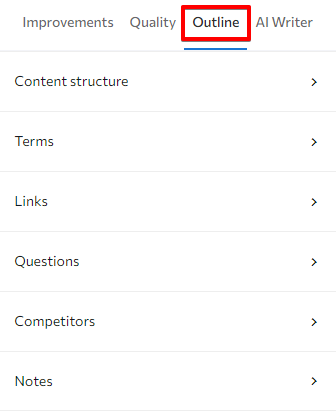
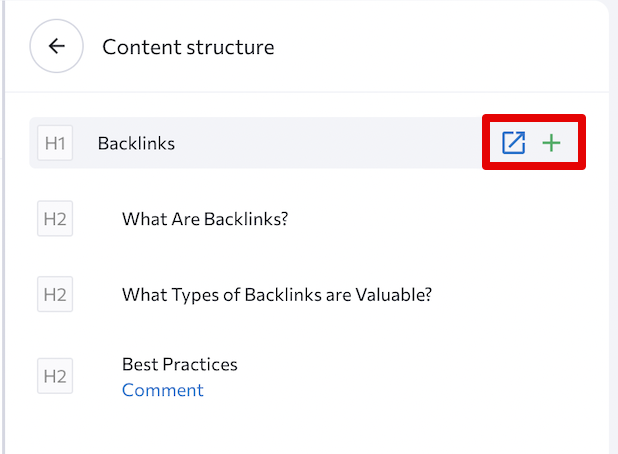
Content structure
Terms
This is where to find the terms you added to the brief that should be included in your article. This category has a filter that allows you to display key phrases with one or multiple (up to 5) words. It also allows you to display keywords that have either already been optimized, partially optimized, or not used at all. You can disable the recommended mention count if you want to. Some terms are marked with “H.” This means that the term is used in your active competitors’ headers, so you should do the same. If you have already used it in your H1-H2 tags, the letter will be green.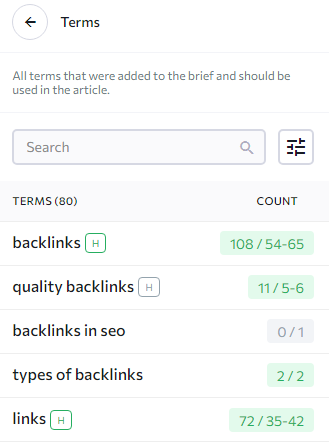
Links
All the links that you’ve added in the brief settings for your article are shown here. You can add a link by pressing the green ‘plus’ button. Links that have already been added are marked with a green checkmark. 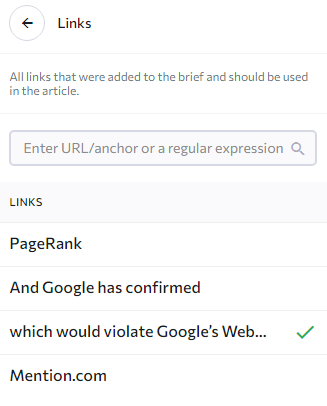
Questions
This is the list of questions added during the brief setup. To add a question to the article, click on the ‘plus’ icon. 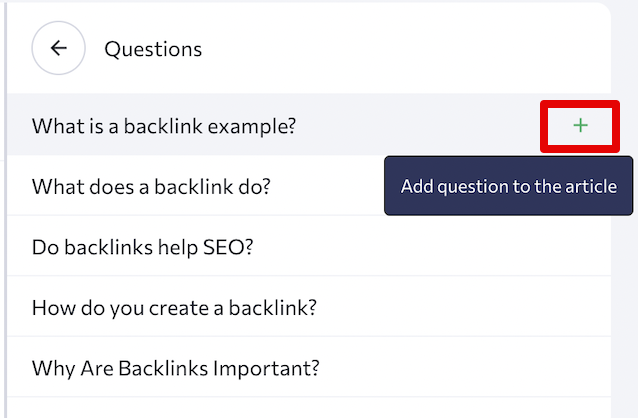
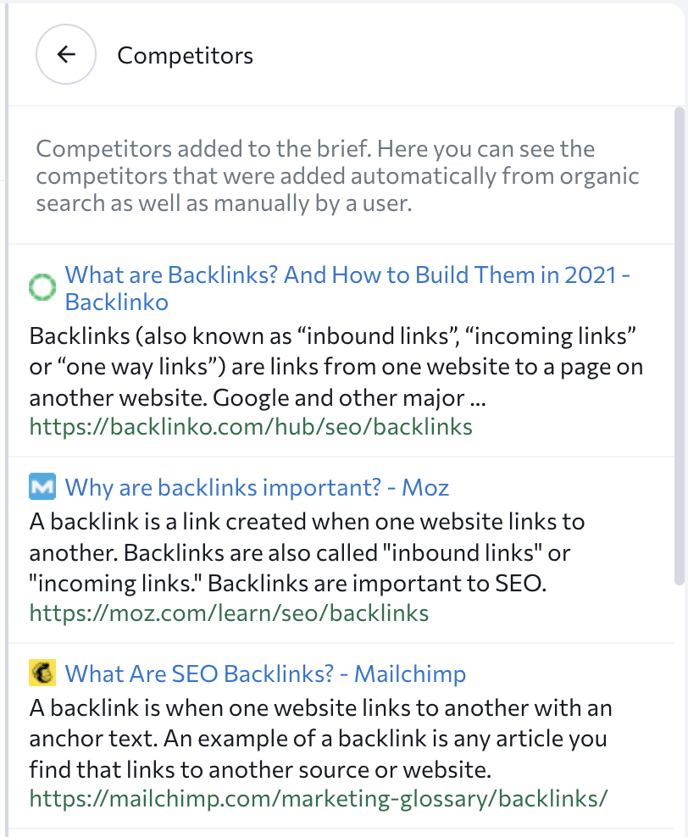
Competitors
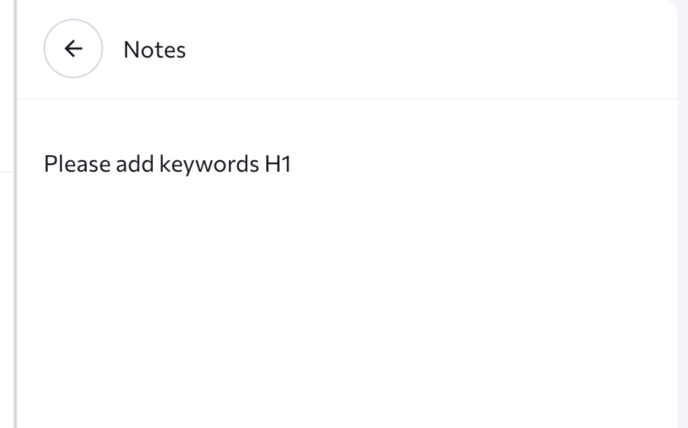
Notes
Notes you can leave for a copywriter. To add them, go to the Brief settings > Notes, then write a comment in the relevant field.
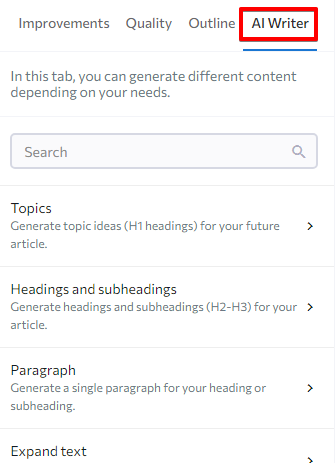
AI Writer
This is an AI-based tool designed to generate article content quickly. You can use it to generate topic ideas, create headings and subheadings (the article’s structure), and write paragraphs for them. The AI Writer tab contains different options for content generation:
- Topics
- Headings and subheadings
- Paragraph
- Expand text
- FAQ section
- Questions
- Answer to the question
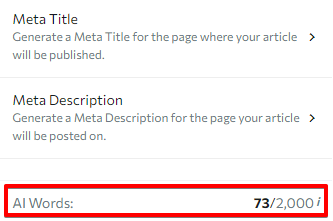
- Meta Title/Description
In the Topics section, you can generate topics (H1 headings) for your article. Enter up to five keywords and set the preferred tone of voice for the AI. Depending on the style you choose, the AI Writer will use different terminology to formulate the article's titles.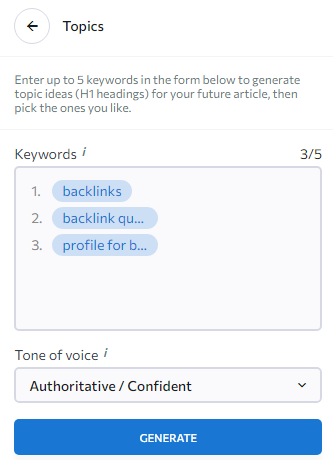
In the Headings and subheadings section, you can generate the entire structure of your article (H2-H3 headings) by using up to twenty specified keywords. Enter any topic you want or use AI-generated suggestions from the Topics menu.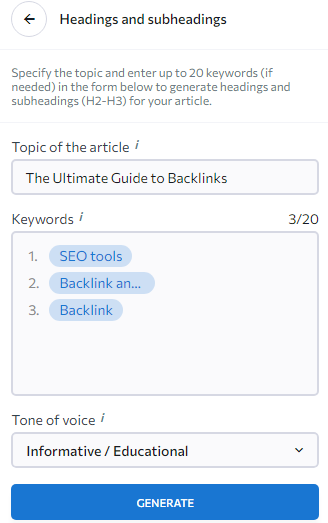
In the Paragraph section, you can write texts for your topic-related headings and subheadings in the tone of voice you’ve chosen. You can also enter up to twenty keywords here, which AI Writer will insert into the paragraphs. 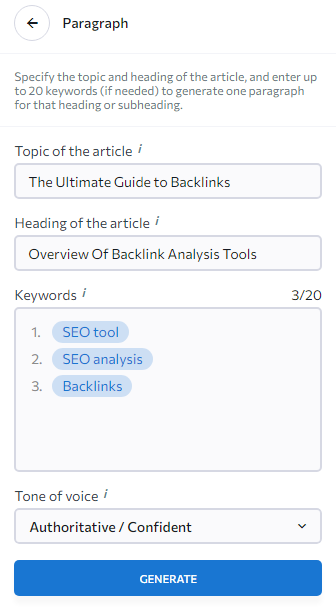
If you need more content for a specific paragraph or would like to turn a short sentence into a longer text, go to the Expand section. This section lets you specify the text you want it to work on. You can also add up to 20 keywords if needed. Keep in mind that you have a limited amount of AI Words depending on your current Content Marketing subscription.
If your article needs an FAQ section, then you can use AI Writer to generate the entire section all at once. If you would like to generate specific questions that will be answered in your text, go to the Questions section. In both of these situations, all you need to do is specify your keywords and select your preferred tone of voice.
Moreover, AI Writer can also write answers to questions it generates as well as any other questions you come up with. To initiate this, open the section called “Answer to the question.” 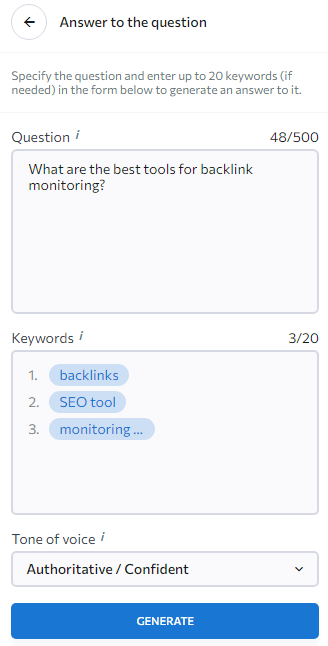
You can generate a Meta Description for the page where your article will be published and a Meta Title for the page featuring your article. Both of these can be generated separately within different sections of AI Writer. In each case, you can enter up to 20 keywords and choose your preferred tone of voice. Just keep track of the number of AI Words available to you.